


Fit your Airgon in under 30 minutes!
Fit your Airgon yourself in under 30 minutes or find a local plumber near you to come and fit it for you.


Reduce heating bills
by up to 20%
Works with ALL wet
heating systems
No More unplanned
maintenance
Prolong the life
of the boiler
Designed & made
in the UK
Reduces your
Carbon footprint
How to fit Airgon yourself
The 6 step guide to fitting your Airgon and for you to start saving money and energy!
Step 1
1
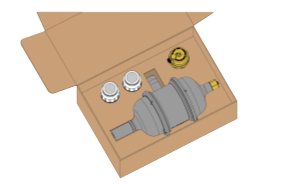
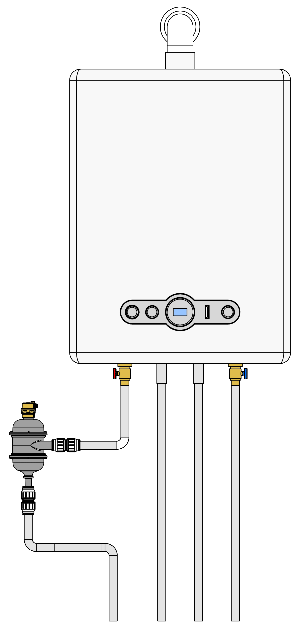
What's in the box
Open the box and check you have everything together with the equipment to complete the installation. See installation instructions included in the box. Make a note of the serial number on the Airgon as you will need this later.
Decide where you are going to fit the Airgon and make sure you are fitting it into the heating circuit NOT the hot water circuit and then prepare your work area.
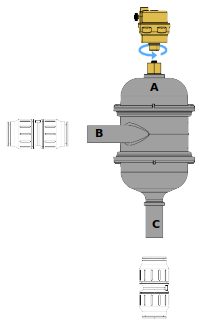
Please ensure you locate the steel washer in to the check valve before you introduce the automatic air vent.
If you do not do this, the air vert will not expel air.
-
Attach the 22mm straight connectors to the inflow (horizontal) pipe and outflow (vertical) pipe on the Airgon by pushing them as far as they will go, then twist the barrel clockwise to lock and secure them in to position.
-
You can install the auto Airvent now or wait until the Airgon is installed into the pipework, the latter makes it lighter and easier to handle. Airgon already has a non return valve (NRV) fitted so you can connect the air vent later.
-
Remember to check the pipe size from the boiler is the same as the 22mm fitting that comes with AIRGON. If yours are smaller (15mm) you need to step down using a 22mm to 15mm reducer, not supplied.
Step 2
2
Before you cut into Pipework
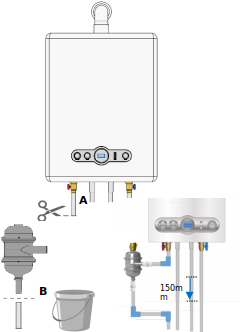
Turn off the water at the main or simply isolate the boiler. It’s safer and easier to isolate the boiler. Now close the feed from the first radiator in line. This will hold the system water in the pipes and radiators.
-
Let the water in the boiler cool before draining it down in to a large bucket and have a second vessel as some boilers can hold 18-20 litres ( a bucket is approx. 10 ltrs) then when its drained you can begin the install.
-
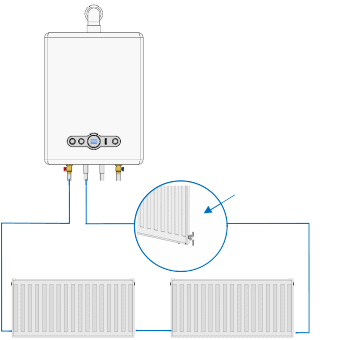
Decide where the Airgon is going to be located in the Flow pipework, the flow takes hot water from the boiler to the radiators. It is beneficial to fit Airgon as close to the boiler as is reasonable but it is not imperative. If you cant manage the flow install it in the return, which is the pipework coming from the radiators - back to the boiler.
-
An airing cupboard is usually a good location for fitting Airgon as it offers an environment with more space and therefore more fitting options. If it is upstairs even better’ as Air rises in the pipework. If you cant decide please contact us and take some images.
Step 3
3
Make your first cut across the pipe
Using a pipe cutter make your first cut across the primary flow pipe. Keep it as straight as possible and allow any water to drain into a container. Complete all the cuts, remove any rouge edges (burrs) then loosely assemble the pipework to make sure everything fits.
-
Make adjustments to make it as neat as possible - check the horizontal pipe (the inflow) with a small spirit level or just your eye and clean any new cuts to ensure all the burrs are removed. If you are joining to copper, make sure the pipe ends are clean and smooth.
-
If you haven’t done this before a tip is to locate the first piece of new pipe into the connector and draw a line on the pipe, so that you know how much goes into the connector, you can then Calculate your cuts.
-
When setting up the installation please ensure a minimum drop of 15cm of pipe from the Airgon Outflow to the first elbow, this creates natural pull and creates a Vortex inside Airgon which assists the removal of gasses.
Step 4
4
Locate the pipework into the connectors
Connect the heating pipes from your boiler in to the push fit connecters on the Airgon and twist the ends until it locks. Check everything is secure and it looks neat vertically and horizontally.
You can now connect the auto air vent. Carefully, wrap the 3/8” male thread of the Auto Air vent in PTFE tape or use a liquid PTFE like Flowmasta which is easier, then introduce the Air vent into the female thread of the Non-Return Valve (NRV) located in the top of the Airgon.
-
Carefully turn the Air vent clockwise until it is firmly attached and hand tighten - take Care not to overtighten and use a spanner or grips to hold the NRV whilst rotating the Air vent. There is no need to use a spanner to tighten the air vent as there is a risk of overtightening.
-
Check each connector is closed and located properly and the Airgon is now secure and installed.
Step 5
5
When the installation is complete
Check your work and clean up.
Before turning on the power to the boiler open the isolation valves by turning them clockwise. Allow the system to refill. It’s a good idea to leave a towel under the installed Airgon in case a loose fitting drips. This is easily resolved by turning off the water supply and retightening.

-
When done and you're happy turn on the water again, then the boiler and check that the boiler is heating up and reaches its operating temperature, Next, check that the radiators are heating up, you can use a thermometer or just your hand.
-
It’s a good idea to bleed the radiators and check the pressure. If you have a pressurised system you will have to refill to a pressure of 1 Bar using the filling loop, then remove the filling loop. Watch Video
-
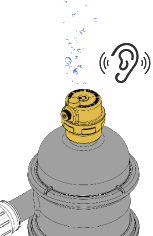
As the system water flows through the Airgon you will hear Air being removed from the system water via the Air vent, it sounds like hissing in short bursts.
Step 6
6
Aireon starts to work immediatelv.
Finally - Loosen the threaded top valve on the Air vent to allow it to continuously vent.
Listen for the air leaving the valve to ensure it’s working. Check temperature of the boiler and radiators. Repeat over the next couple of days as you may need to turn down the thermostat. Removing air removes the thermal barrier caused by Nitrogen so less fuel is required for the same heat output.
-
There may also be a drop in pressure. This is easily resolved by topping up the system water. See the video in Step 5 or this one Watch Video
-
Check the air vent once a week in the first month in case it gets blocked with debris from the system water. To clean it, turn off the boiler and allow it to cool, then remove it and clean it by unscrewing it from the non-return valve and wash it through in warm soapy water then rinse and reinstate it. The Airgon is located into a Non-return valve for this reason.
-
Congratulations you are now a qualified Airgon Installer
do not forget to register your airgon on our website for warranty and guarantees.
Find a plumber near you
Please Enter Your Postcode To Begin
The plumbers on this database are either Gas Safe or CIHPE registered professionals. They have not been referenced and we do not recommend anyone unless they are accredited as an Airgon Installer. This means they have completed a number of Airgon installations and have received excellent feedback.
Plumbers are always very busy so please call in the evening or leave a voice message stating:
1.Your name and telephone number
2.Contact postcode
3.Job description
Installation of an Airgon into the existing pipework Taking around 30-40 minutes.
Frequently asked questions
Start saving with Airgon now!
Shop now- Choosing a selection results in a full page refresh.
- Opens in a new window.